Creating a functional workspace is essential for productivity and satisfaction. An L-shaped desk is a popular choice for this. In this article, we will explore its benefits, provide a DIY guide, and offer productivity tips.
Benefits of an L-Shaped Desk
An L-shaped desk offers several advantages over traditional desks. One of the main benefits is that it usually comes with two tabletops, which provides ample space for multiple monitors or work devices. This makes it especially useful for professionals who require a dual-screen setup or for those who multitask on a regular basis. The extended surface area allows for better organization, enabling you to separate different tasks or projects on each portion of the desk. With the right configuration, an L-shaped desk can enhance workflow efficiency and minimize clutter.

Building Your DIY L-Shaped Desk
Building an L-shaped desk can be a rewarding and cost-effective DIY project. Here's a step-by-step guide to help you get started:
1. Plan and measure
Determine the size and dimensions of your desk, taking into consideration the available space in your office or home. Consider factors such as ergonomics, storage needs, and any additional features you desire. Normally, an L-shaped desk with unequal sides can have a length ranging from 60’’ to 72’’ on the longer side and 48’’ to 58’’ on the other (please refer to pic 1). And L-shaped desks with identical sides can have an average length of 50 inches (please refer to pic 2). As for height, the standard height of an L-shaped desk is 29’’ to 30’’.
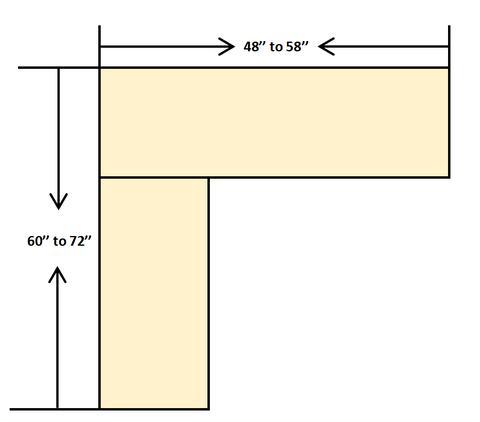
Pic 1
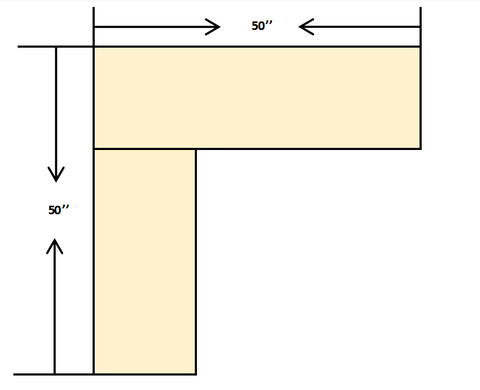
Pic 2
2. Gather materials
Purchase the necessary materials, such as tabletops, screws, and brackets. Opt for sturdy and durable materials that will support the weight of your equipment.
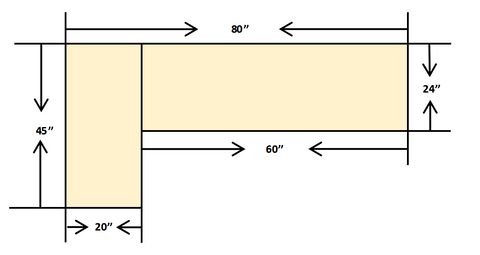
Kaboon has many sizes of tabletops in multiple colors for your choice. A popular combination for home-office workers and students is 60’’*24’’ plus 42’’*20’’, as it could be flexibly organized to 80’’*42’’ and 60’’*66’’ to meet most needs (please refer to pic 3&4).
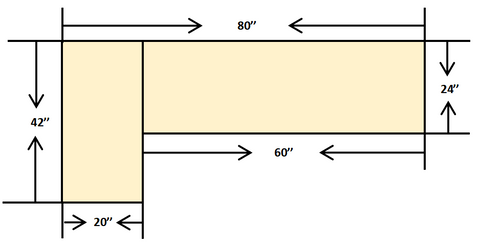
Pic 3

Pic 4
The combination of 60’’*24’’ plus 45’’*20’’ is also recommended, which can be placed to 80’’*45’’ or 60’’*69’’ for more storage space (please refer to pic 5&6).
Pic 5
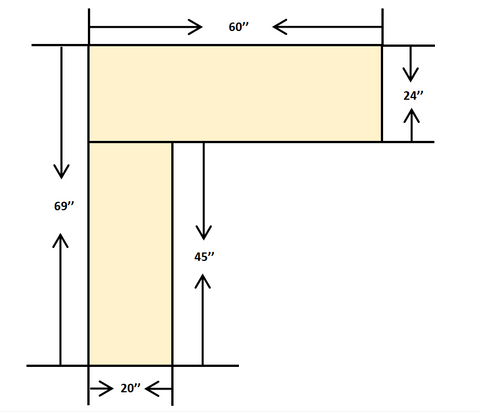
Pic 6
3. Assemble the frame
Attach the frames to the tabletops respectively, using screws or adhesive, ensuring a secure and stable frame. Use a level to make sure the desk is even and sits properly on the floor.
4. Secure the desks together
Arrange the desks in an L-shape and secure them with brackets.
5. Customize and accessorize
Personalize your desk by adding cable management solutions, drawers, shelves, or any other accessories that suit your needs. Consider using adhesive cable clips or grommets to keep cables organized and prevent tangling.
Setting Up Your L-Shaped Desk
Once your DIY L-shaped desk is complete, it's time to set up your workspace for maximum productivity:
1. Positioning
Place your desk in a well-lit area with good ventilation. Position it near a power outlet for easy access to electrical devices.
2. Ergonomics
Adjust your chair and monitor heights to ensure a comfortable and ergonomic working position. Consider investing in an ergonomic chair and using a monitor stand to place your screens at eye level.
3. Organization
Utilize desk organizers, file holders, and small storage units to keep your desk free from clutter. Assign specific areas for different work-related items to maintain a neat and organized space.
4. Lighting
Incorporate task lighting, such as a desk lamp, to reduce eye strain and enhance visibility, especially when working in dimly lit areas.
5. Personal touches
Add personal touches like plants, artwork, or motivational quotes to create a pleasant and inspiring work environment. Here are some beautiful setups from our customers.
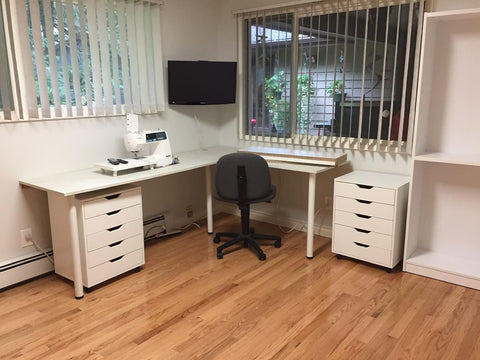

@homedecor_by_carrie on IG has used the combination of 60’’*24’’ and 42’’*20’’ to make an L-shaped desk. Click the below link to enjoy the original post!
https://www.instagram.com/p/CusP8FOpCp8/
Building your own DIY L-shaped desk provides practicality, customization options, and cost savings. By following the step-by-step guide and implementing proper setup techniques, you can create a workspace that promotes productivity and enhances your overall work experience. Invest the time and effort into crafting your ideal L-shaped desk, and you'll reap the benefits for years to come.
For more info, please check:
https://www.kaboondesk.com/collections/table-top
Love this practical DIY guide for building an L-shaped desk! It’s inspiring for anyone who wants a custom workspace. For those looking for ready-made options, Corner Desks UK also offers a great range of functional and stylish desks. Learn more: https://www.cornerdesksuk.co.uk/
Can I order a custom “L” shaped counter top ?I already have ordered a custom lenght top
Leave a comment